Fingerstyle Guitar Lessons for Beginners: Essential Techniques and Tips
If you’re looking for your first beginner fingerstyle guitar lesson, this guide can help.
The best way to learn this expressive playing style is to:
- Learn through simple patterns
- Focus on technique before songs
- Establish a consistent practice routine
Table of Contents
Fingerstyle Guitar Lessons for Beginners: Getting Started
Finger Names
Three First Fingerstyle Patterns
Basic Pattern
Outside-in Pattern
Basic Roll pattern
Essential Technique to Play Fingerstyle Guitar
Practice Techniques That Work
Habits to Avoid
Beginner-friendly Songs to Learn
A World of Musical Possibilities
FAQs
Fingerstyle Lessons for Beginners: Getting Started
In fingerstyle guitar, we pluck the strings directly with the fingers and thumb. The thumb typically plays the bass strings and often alternates between them. The fingers play combinations of the remaining strings.
It’s tempting to rush into complex patterns immediately. And to try out our favorite songs. Instead, it’s important to take some time to master the fundamentals.
Think of it a bit like learning a new language. We start with the alphabet (individual finger movements). Then attempt full sentences (complete songs).
Ideally, it’s good to aim for some focused practice daily. This way we’ll develop the muscle memory and coordination needed.
Six Tips to Success:
- Start with proper hand position and basic movements. (See Essential Technique below.)
- Begin by developing finger independence through simple exercises on open strings (ie. don’t use the fretting hand)
- Start with the basics, and build on foundational elements
- Leave chord changes until later
- Consider learning basic classical guitar skills (even if fingerstyle is your goal)
- Remember that consistent, focused practice beats sporadic long sessions every time.
Finger Names
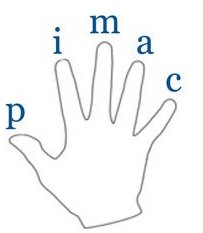
In fingerstyle, we often use shorthand for our picking fingers. We use ‘p’ for thumb, ‘i’ for index, ‘m’ for middle, and ‘a’ for ring. This makes it easier to read, learn and remember patterns.
The majority of people use their right hand to fingerpick. But some people use their right hand as the fretting hand and the left as the picking hand. It makes no difference.
Picking hand finger names
p= thumb
i = index
m = middle
a = ring finger
c = pinky finger (although we don’t usually use it)
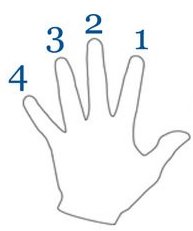
Fretting hand finger names
The fingers on the fretting hand are numbered 1 – 4 as in the image below.
Three First Fingerstyle Patterns
Most beginner fingerstyle guitar lessons will start with learning basic patterns. Even these may take a little while to get used to, so be patient.
Keep your picking hand relaxed and your movements minimal. For more on right-hand technique, see Essential Technique to Play Fingerstyle Guitar below.
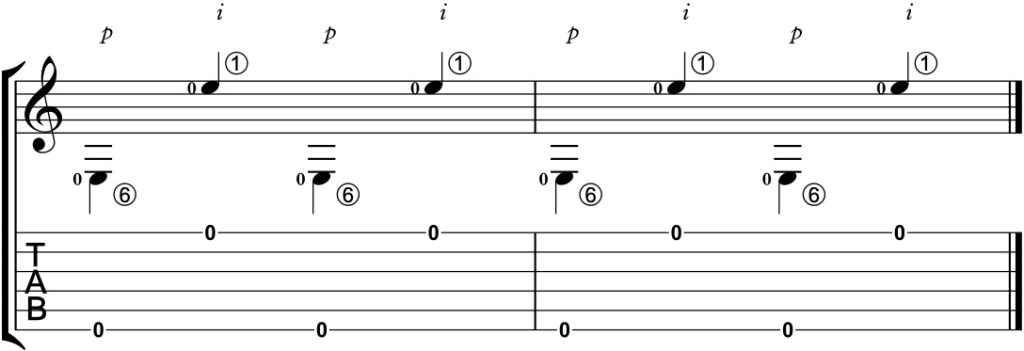
1) Basic Finger Pattern
This basic pattern forms the foundation for more complex fingerpicking techniques.
- Fingers index (i), middle (m) and ring (a) play the top (thinnest) three strings (E, B and G).
- The thumb (p) plays the bass notes (D, A and E).
Step One
Start by playing a bass note (such as E) with the thumb (p). Keep to a steady beat (pulse). Begin slowly, but keep it regular.
Step Two
Using the thumb (p) and index finger (i), pluck the low E and high E strings alternately to the same steady pulse.
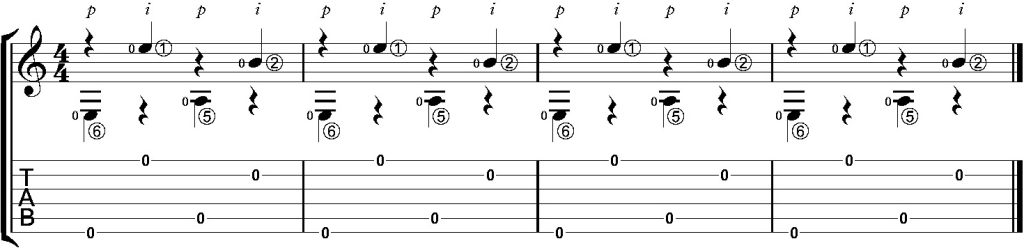
2) The Outside-In Pattern
We can learn the Outside-In Pattern in two stages:
Step One
a) To begin, use your index (i) or middle finger (a) at the same time as your thumb to play the outside two strings together. These are strings 6 and 1.
b) Then play the next two strings in from these. So strings 5 and 2.
(For this pattern, we omit strings 4 and 3. Though we can substitute string 4 for string 5 if we like.)
c) Alternate between these two sets in a steady rhythm.
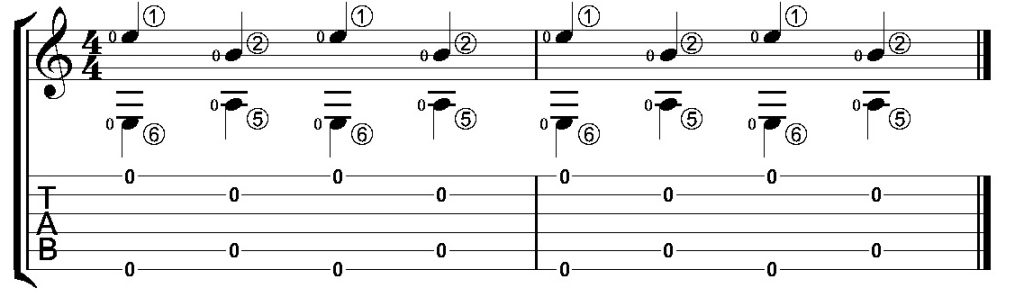
Once this is flowing and consistent, we can move to step two.
Step Two
Here we offset the two pairs from Step One.
Instead of playing strings 1 and 6 together, play them one after the other. 6 then 1. Then do the same with strings 5 and 2.
So the full pattern moves in string order: 6–1–5–2 in a steady loop.
We can adapt this pattern for different chords:
- 6-string chords (Example: G chord): 6-1-5-2
- 5-string chords (Example: A, C chord): 5-1-4-2
- 4-string chords (Example D, F chords): 4-1-3-2
Listen to “Landslide” by Fleetwood Mac for a beautiful version of this style of picking
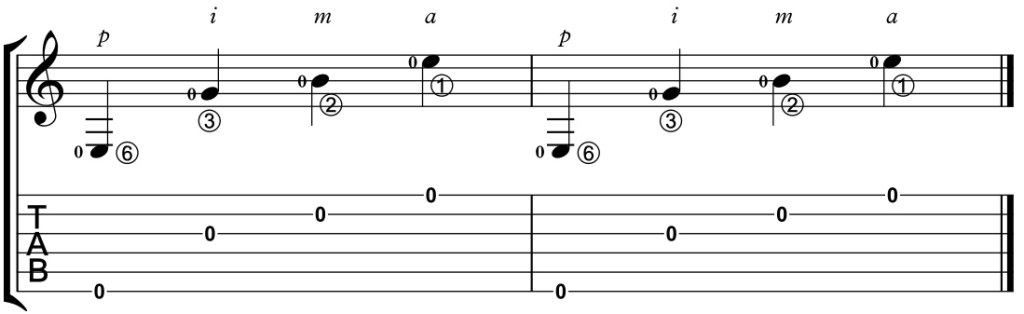
3) The Basic Roll Pattern
Rolling is a basic arpeggio pattern often found in classical guitar music too. (Arpeggio means “broken chord”.)
The basic roll pattern is often used in songs like ‘The House of the Rising Sun.’ Try it on the Am chord to hear how it sounds.
Step One
Place p on a bass note. Then place your fingers on the top three strings. (i on the G string, m on the B string and your a finger on the high E string.)
(The pattern usually uses the top three strings (G, B and E), but we can use the 4th, 3rd and 2nd (D, G, B) if it sounds good.)
Step Two
Pluck each string in turn, starting with the bass string. The series is: p, i, m, a (repeat).
Step Three (optional)
Extend the sequence so you reverse back through the strings: p, i, m, a, m, i.
You then repeat the cycle starting again with p.
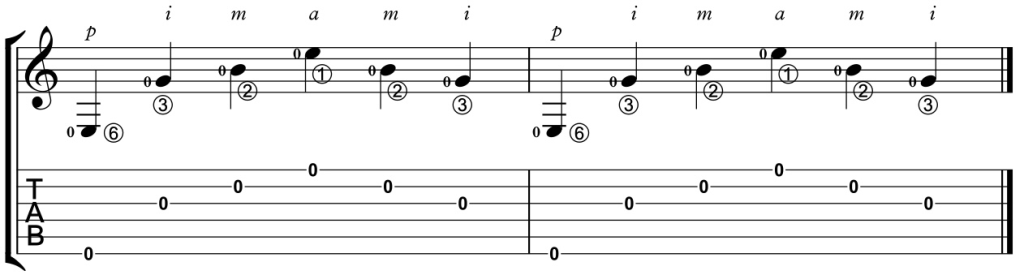
This is more like the arpeggio technique used by classical guitarists. But you may have heard people use it to play a simple version of “The House of the Rising Sun.”
Optional Extra: Alternating the Bass
Alternating the bass notes is a common practice.
So for a C chord, play the fifth string with p first. Then when it’s time to use the thumb again, play the fourth string instead. These are the notes C and E, which are part of the C chord.
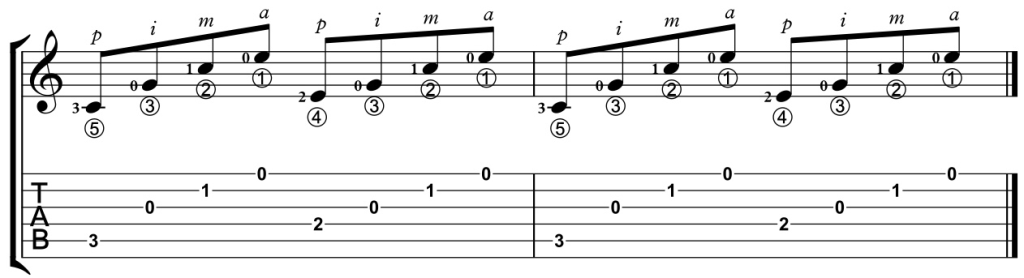
We can experiment to find which bass strings sound good in which chords.
Essential Technique to Play Fingerstyle Guitar
Many famous finger-style players have developed their own plucking techniques.
The legendary Elizabeth Cotton, for instance, was a self-taught left-handed guitarist. She played a guitar strung for a right-hander – but played it upside down! So she played bass notes with her fingers, and the tune and accompaniment with her thumb.
We can see videos online of players using all kinds of variations. These include using a single finger for different strings, or resting unused fingers on the guitar top.
Nevertheless, starting with the foundations of a good technique will improve your agility and keep your hands healthy. Of course, you don’t have to have lessons in classical guitar technique to play modern fingerstyle. You can still jump right into learning patterns and songs. But the following tips can benefit all styles of playing.
Right Hand (Picking Hand) Tips:
Think of gently pushing the string towards the guitar body. Then release the string so your fingers end up pointing at your elbow, rather than plucking the strings away from the guitar. (It can be thought of as a small scooping motion.)
The aim is to prevent injury and make it easier to fingerpick:
- Keep the wrist relaxed, and floating above the strings, rather than bracing it on the guitar
- Avoid bending your wrist too much as this can cause tension
- Keep the fingers gently curved
- Position the thumb slightly forward of the fingers
- Keep the fingers close together to increase accuracy
- Move the fingers from the big knuckles (the ones that run across the back of your hand)
- Don’t rest your pinkie on the guitar top as it can restrict your hand movement
Left Hand (Fretting Hand) Tips:
- Keep the thumb straight and centered behind the guitar neck so you can reach further with the fingers
- Use your fingertips to avoid touching and muting other strings
- Press enough to achieve a clean sound (but no more)
- Try to keep your wrist fairly straight and your knuckles parallel to the floor
- Keep your nails short
Practice Techniques That Work
We don’t have to get it all perfect straight away. Just get it started. Even if we’re stumbling through a pattern, that’s progress. We’re moving forward.
However, part of learning guitar is learning how to practice, so we make progress. Here are some tips to make practicing your fingerstyle technique more effective:
1. Use a metronome
(Using a metronome can help you develop steady timing, but if it feels overwhelming at first, focus on getting comfortable with the patterns. Once you’re ready, start with a slow tempo and pluck one string on each tick.)
- Focus on a steady rhythm
- Increase speed gradually
- Start at 60 BPM (beats per minute or even slower)
- Check your timing is accurate
- Check your chord changes are smooth
- Listen for unwanted buzzing
3. Practice without looking at your hands. This:
- Develops muscle memory
- Improves finger and hand coordination
- Builds confidence
- Enables you to read lyrics at the same time
Habits to Avoid!
It’s beneficial to work slowly and accurately. This is better than developing bad habits that need correction later.
Try to avoid:
- Playing too fast too soon
- Trying to learn full songs before you’re secure with basic patterns
- Looking at either hand when you don’t need to
Beginner-Friendly Songs to Learn
Anyone exploring fingerstyle playing is likely to be familiar with some chords. If you’re not, it makes sense to start with the “cowboy” or open chords.
Once we have mastered a few chords, we can start to play them one after the other in a sequence. This is called a chord progression. Most songs are made up of chord progressions.
We can now start fingerpicking simple songs. Look to the 1960s and ’70s for inspiration. A lot of country music is perfect too. Or start with campfire tunes.
Then we can move on to great, atmospheric pieces like these:
1. “Dust in the Wind” (Kansas)
- Thumb and finger together on the first beat, followed by a simple thumb-finger alternation
- G and Am chords
- Steady picking pattern
2. “Is There Anybody Out There?” (Pink Floyd)
- Basic roll pattern (up and down arpeggio version)
- Am, F, A, C, Bm chords
- Optional: Original adds in extra notes from the chords for interest
3. “Nothing Else Matters” (Metallica)
- The introduction uses basic roll pattern arpeggios
- Em and G chords
- Optional: Original adds in extra melody notes
4. “Everybody Hurts” (R.E.M)
- Roll pattern arpeggios
- D, G, Em and A chords in verse and chorus
- Optional: Add in extra descending bass notes as you change chords
A World of Musical Possibilities
Even the simplest fingerstyle patterns can sound beautiful. We don’t need to shred or play fast. Just a few plucked notes, and we’ve got music.
Fingerstyle can feel tricky at first, but every time we practice, we’re building muscle memory. It takes time, but with proper technique and consistent practice, we can soon be plucking wonderful accompaniments to our favorite songs.
If you want to build a foundation of good guitar technique, consider joining The Woodshed® Classical Guitar Program. Even if classical music pieces are not your thing, classical guitar technique makes playing any style or genre of music better. Click Here to learn more about it.
FAQs
Q: How long should I practice each day?
A: Start with a few minutes of focused practice and build it up. Quality matters more than quantity.
Q: Do I need long fingernails?
A: Longer nails can help create a brighter tone, especially for classical or fingerstyle guitar, but they’re not necessary. Many players use just their fingertips or a combination of nails and skin. Experiment to see what works best for you.
Q: Can I start with a steel-string acoustic?
A: Yes, most fingerpicking songs are played on acoustic guitars, although nylon strings are easier on beginner fingers. Children will probably find nylon strings more comfortable too.
Q: Should I use fingerpicks?
A: Fingerstyle guitar is usually played with the fingers. But you can use thumb picks, and some people use a combination of flat picks and fingers.
Q: Do I need to know lots of chords?
A: Learning the open chords first will help, but you can start with right-hand fingerpicking techniques on open strings.

Hi, I’m Allen Mathews.
I started as a folk guitarist, then fell in love with classical guitar in my 20’s. Despite a lot of practice and schooling, I still couldn’t get my music to flow well. I struggled with excess tension. My music sounded forced. And my hands and body were often sore. I got frustrated, and couldn’t see the way forward. Then, over the next decade, I studied with two other stellar teachers – one focused on the technical movements, and one on the musical (he was a concert pianist). In time, I came to discover a new set of formulas and movements. These brought new life and vitality to my practice. Now I help guitarists find more comfort and flow in their music, so they play more beautifully.
Click here for a sample formula.
Hi Allen, I am thoroughly enjoying your website and I find it is just what I need in my renewed passion for classical guitar. I have rediscovered a great love for this instrument and the music I can learn and play and it has changed my life for the better dramatically! Thank you for facilitating this process.~
~ George Rogers
-George Rogers
I just want to thank you for your lessons. You are helping us to understand how a piece is composed, the parts to analyze and how to do it. You are teaching a lot about how to read and play, and the most important part: PLAY with the music and ENJOY it.
~ R. Martinez
-R. Martinez
“Success lies in relentless execution of the basics.”
Join the program that takes you from the beginning fundamentals to advanced mastery, so you…
- Move your hands safely and fluidly
- Enjoy fulfilling practices and meaningful work
- Play beautifully with expression and flow
Click the button to take a step towards an
organized, effective guitar practice. >>>