How to Play the D Chord on Guitar
How to Play the D Chord on Guitar
The D chord is one of the first chords we learn when we begin playing guitar.
Mastering the D chord will help any guitarist dive into different styles of music. It is found in different genres such as rock, surf, classical, and ska. And it’s a useful one to know because it often crops up in music written in the common keys of G and A.
In this guide, we will explore how to play the D Major and D minor chords. We’ll look at:
- How to play the most common D guitar chord shapes
- How to play a D barre (bar) chord – and why it can be challenging
- How to play the D chord more easily and make it sound cleaner
Table of Contents
- What is a D Chord?
- How to Play the D Chord on Guitar
- How to Understand Chord Diagrams
- D Chord Diagram
- D Minor Chord
- Barre Chords
- Ways to Play the D Chord More Easily
- Wrist Position
- How to Play the D Chord with a Right-Hand Pattern
- Classical Guitar Technique for More Effective Right-Hand Ability
- Music Theory: What is a Chord?
- Chords that Sound Good with the D Chord
- Chord Progressions
- Popular Pieces with the D Major Chord
What is a D Chord?
The D chord on the guitar consists of three notes: D, F#, and A. These are the first, third, and fifth notes in the scale of D major. The first note is called the “root note”.
Sometimes these notes will occur more than once on different strings. But together, they form the D major chord, commonly known as “D”.
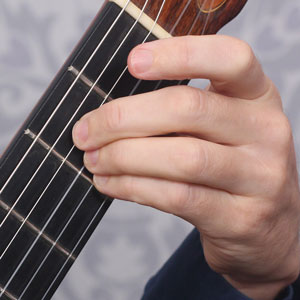
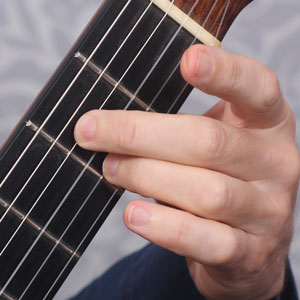
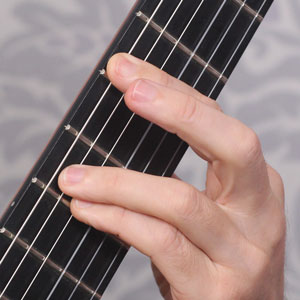
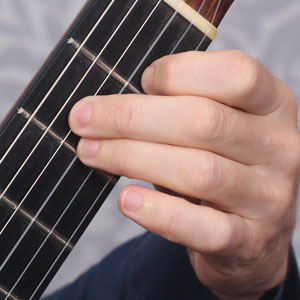
How to Play the D Chord on Guitar
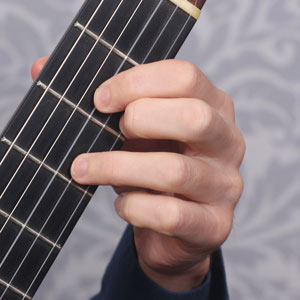
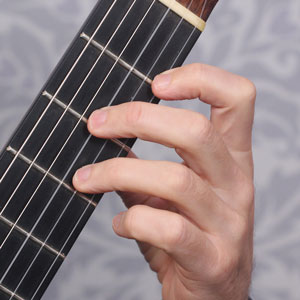
The image to the left is a D major chord. The image to the right is a D minor chord.
If we listen to the two chords one at a time, we’ll hear the difference. It’s only one note, but it gives each chord a distinct “quality”.
Major chords can be said to sound “happy” and minor chords are sometimes described as “sad”.
To learn how to play these chords, we can use a chord diagram.
How to Understand Chord Diagrams
A guitar chord diagram is a useful tool for learning chords. It tells us which strings to play, and which fingers to use.
The Left-Hand Fingers
We number the left-hand fingers 1 to 4.
1 is the index or pointer finger. And 4 is the little finger.
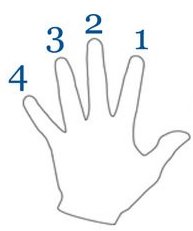
Left hand finger numbers
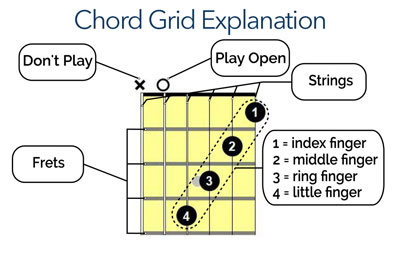
How to read a guitar chord diagram
D Chord Diagram
Let’s take a look at the most popular D chord shape on guitar.
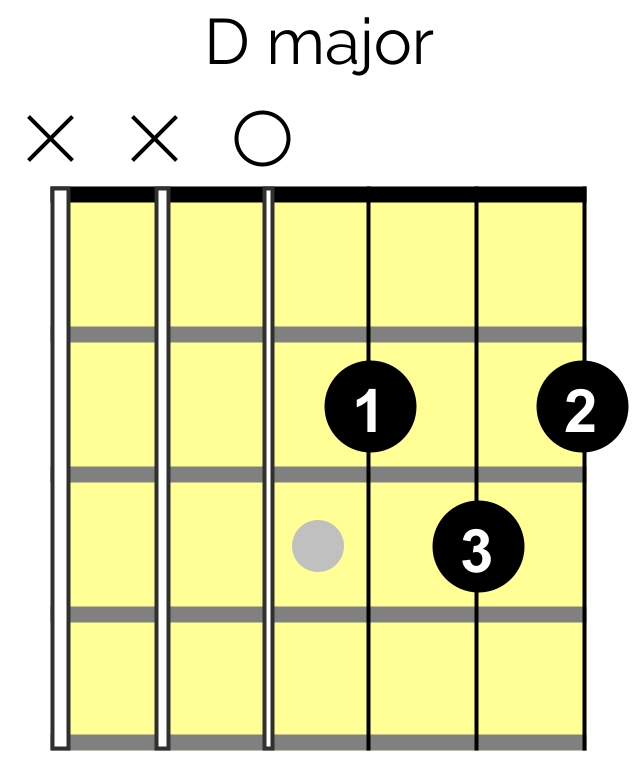
D Major Chord
Steps to play a D chord:
- Step 1: Finger 1 on the 2nd fret of the 3rd string (g string)
- Step 2: Finger 2 on the 2nd fret of the 1st string (e string)
- Step 3: Finger 3 on the 3rd fret of the 2nd string (b string)
- The 6th and 5th strings are not played
It might be a tight squeeze getting the first finger and the second finger on the same fret. But with a little practice, it’ll begin to feel like second nature. Especially if we get our left hand in the best position.
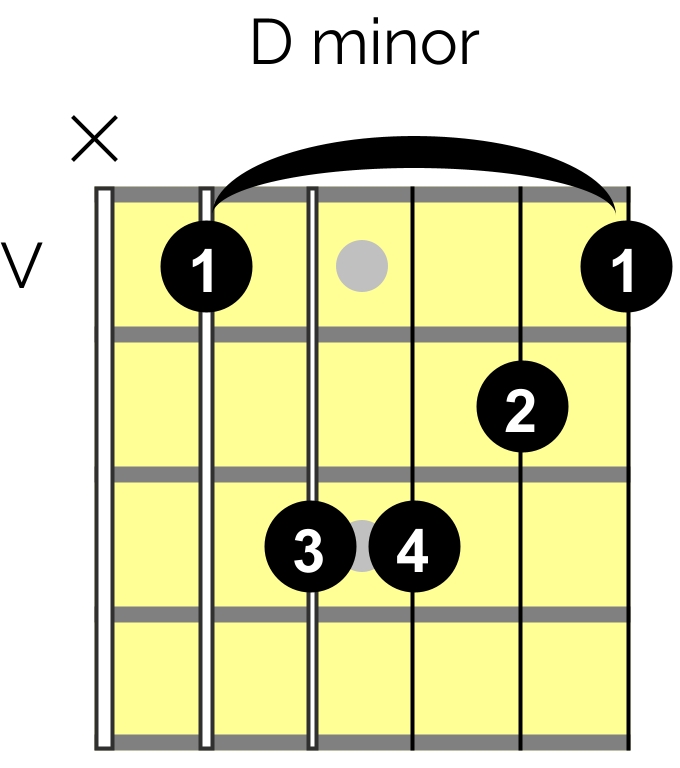
D Minor Chord
Let’s look at the diagram for the D minor guitar chord.
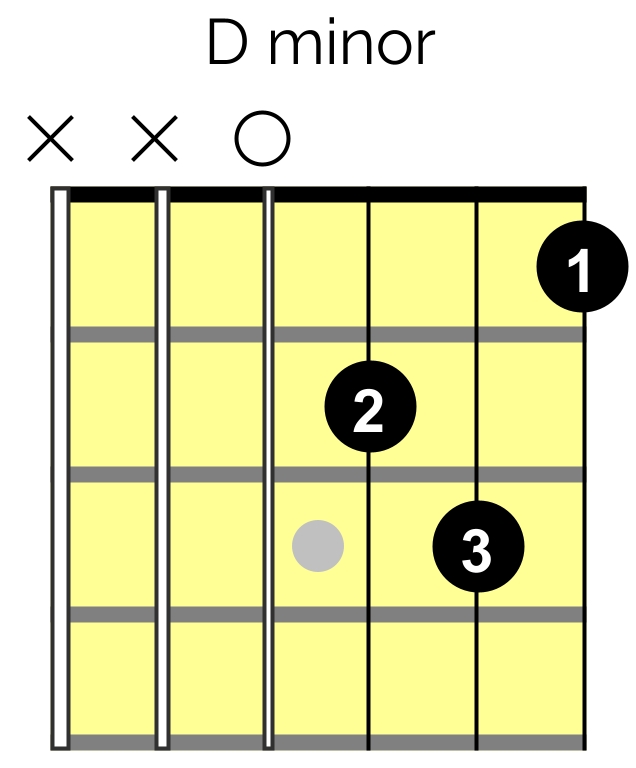
D Minor Chord
Steps to play a Dm chord:
- Step 1: Finger 1 on the 1st fret of the 1st string (e string)
- Step 2: Finger 2 on the 2nd fret of the 3rd string (g string)
- Step 3: Finger 3 (or Finger 4) on the 3rd fret of 2nd string (b string)
- The 6th and 5th strings are not played
Give the D minor chord a few strums and get it to sound as clean as possible. Some people prefer to use the fourth finger instead of the third finger as it can feel less of a stretch.
Don’t worry if you get a few buzzes. This is normal when learning new chords on the guitar.
Barre Chords
Note for beginners: Feel free to skip this section. You can return to it later if you choose.
A bar (barre) chord substitutes the first finger for the nut (fret zero) of the guitar. The first finger lays across two or more strings, while the other fingers fret other notes. By eliminating open strings, we can play chords all over the guitar neck.
Playing barre guitar chords can be difficult. Our fretting hand can get tired quickly. And we can mute strings by mistake or get unwanted buzzing sounds.
One of the most common issues with barre chords is excess tension. We tend to press too hard. Over time this may lead to injury.
Selective pressure will help with any barre chord. This means paying close attention to which strings we press for a given chord. Then we can press with more appropriate pressure where we need it, and avoid pressing too hard where we don’t.
With the right technique, we can play barre chords more easily.
The D Major Barre Chord Diagram
We can use a five-string bar to play a D major chord shape.
This is more challenging than the “open” D chord above. But it’s a common moveable chord shape, worth perservering with.
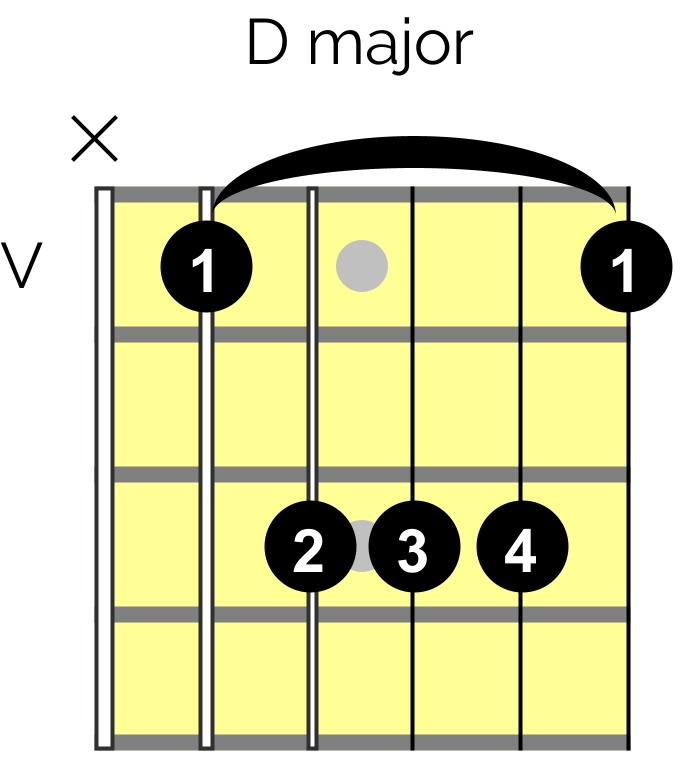
D Major Bar Chord
Steps to Play the Five-String D Barre Chord
- Step 1: Finger 1 on the 5th fret, strings 5, 4, 3, 2 and 1
- Step 2: Finger 2 on the 7th fret of the 4th string
- Step 3: Finger 3 on the 7th fret of the 3rd string
- Step 4: Finger 4 on the 7th fret of the 2nd string
We can use selective pressure with this version of the D chord. If we’re able, we can relax the bar on strings 2, 3, and 4 because other fingers are fretting those strings.
Don’t worry if this seems difficult. It can take some time to master!
The D Minor Barre Chord Diagram
We can use a five-string bar to play a D minor chord shape.
This is harder than the “open” D minor chord above. But, just like the D Major barre chord, it’s a common shape that’s worth adding to your arsenal.
D minor Bar Chord
Steps to Play the Five-String D minor Barre Chord
- Step 1: Finger 1 on the 5th fret, strings 5, 4, 3, 2 and 1
- Step 2: Finger 2 on the 6th fret of the 2nd string
- Step 3: Finger 3 on the 7th fret of the 4th string
- Step 4: Finger 4 on the 7th fret of the 3rd string
Ways to Play the D Chord More Easily
Encountering difficulties with the barre D chord? Let’s address three common challenges and explore strategies to make playing this chord more manageable. It’s not just about having strong index fingers!
Muted or Buzzing Strings
Achieving a proper hand position on the guitar fretboard is crucial.
Keep your thumb centered behind the fifth fret for optimal leverage, avoiding excessive squeezing.
Adjust the position of your index finger to prevent strings from settling within knuckle creases. For a better sound, roll your barring finger slightly to the side, using the bony part.
Keep other fingers on their tips to avoid accidental touches on adjacent strings.
Place your fingertips just behind the metal frets without touching them.
Hand and Finger Fatigue
Combat fatigue by taking regular breaks during practice sessions.
Incorporate hand and finger stretching exercises to warm up tendons, ligaments, and muscles.
We can also practice lightly touching the strings without applying pressure to conserve energy.
Clumsy Chord Changes
Contrary to intuition, practicing slow chord changes enhances accuracy, gradually building strength, dexterity, and speed.
Position your fingers in the chord shape above the fret before pressing down on the strings, a technique known as proprioception.
This proactive approach aids in smoother and more precise chord transitions.
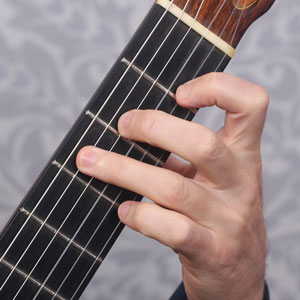
Wrist Position
The wrist positions the fingers. So we can play more easily and consistently if the wrist puts our fingers in the best place.
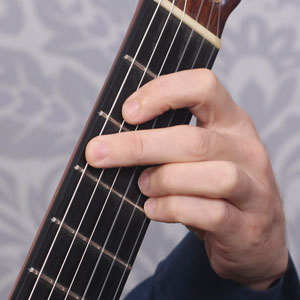
The ideal left-hand position is the “C” shape. This shape allows for freedom of movement and stretch.
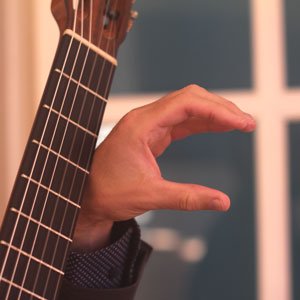
The neutral left-hand “C” shape
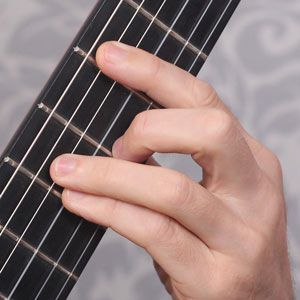
As a general rule, the best wrist position is one that keeps our big knuckles parallel to the side of the fretboard. This keeps all four fingers over the strings.
However, when we need more than one finger on the same fret, we can tilt our wrist. This change of position brings our fingertips more in line with the fret. And this makes it easier to keep each finger just behind the fret.
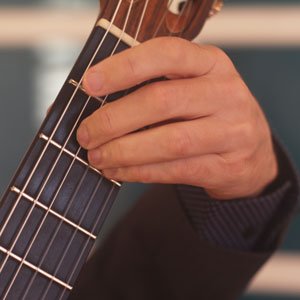
Left hand with tilt in the wrist
We must remember to return to the original position when we shift to new chords or notes.
How to Play the D Chord with a Right-Hand Pattern
Using different right-hand patterns allows us to produce various sounds and textures on the guitar. Learning these patterns is not only a great musical exercise but also beneficial for enhancing dexterity and control.
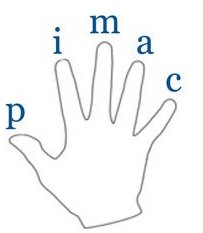
Right-hand finger names
First, we call the right-hand fingers:
- P – Thumb
- I – Index
- M – Middle
- A – Ring Finger
- C – Little Finger (Pinky)
One common pattern is PIMA (thumb, index, middle, ring), widely used in various music styles.
To apply this pattern:
- Form the D chord with the left hand.
- Position the I, M, and A fingers of the right hand on strings 3, 2, and 1, while the thumb prepares for the 5th string.
Here are the steps to play the PIMA right-hand pattern:
- P (thumb) plays the open 5th string
- I (index) plays the 3rd string
- M (middle) plays the 2nd string
- A (ring) plays the 1st string
- Repeat the pattern in a steady rhythm.
Another commonly used fingerpicking pattern with chords is the “outside-in” approach.
Classical Guitar Technique for More Effective Right-Hand Ability
In classical guitar technique, focusing on right-hand positioning and patterns is crucial.
We have proven methods of form, positioning, and movement. And these make fluid and beautiful playing possible.
Much of classical guitar technique is non-intuitive. So self-learners may miss ways to make playing easier and more graceful.
If you’re aiming for powerful and effortless guitar playing, The Woodshed® Classical Guitar Program provides a step-by-step approach.
Whether you’re a beginner or looking to fill in gaps in your skills, this program helps you quickly progress toward playing smooth and beautiful music. Click here to explore the course.
Music Theory: What is a Chord?
Music theory helps us understand how notes and chords come together to make the music we enjoy.
Is it necessary for beginners? Not really. It’s more important to practice chords and get comfortable with playing the guitar. You can explore theory later if you want.
But if you are interested, in this section we’ll explore the musical alphabet, which has notes A, B, C, D, E, F, and G.
These notes can be made higher (sharp) or lower (flat) in pitch.
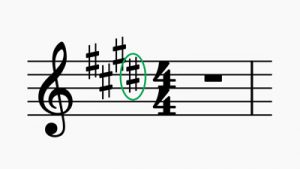
Sharps
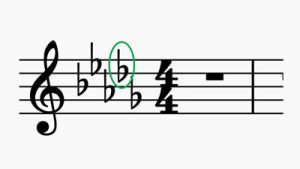
Flats
- On the guitar, we sharpen a note by moving one fret higher
- To flatten a note, we move one fret lower
There are 12 notes in total, repeating as you go higher or lower.
Even though there are 12 notes, most music focuses on a “key,” which is just seven notes. For example, the Key of D includes the notes:
D, E, F#, G, A, B, C#, and D.
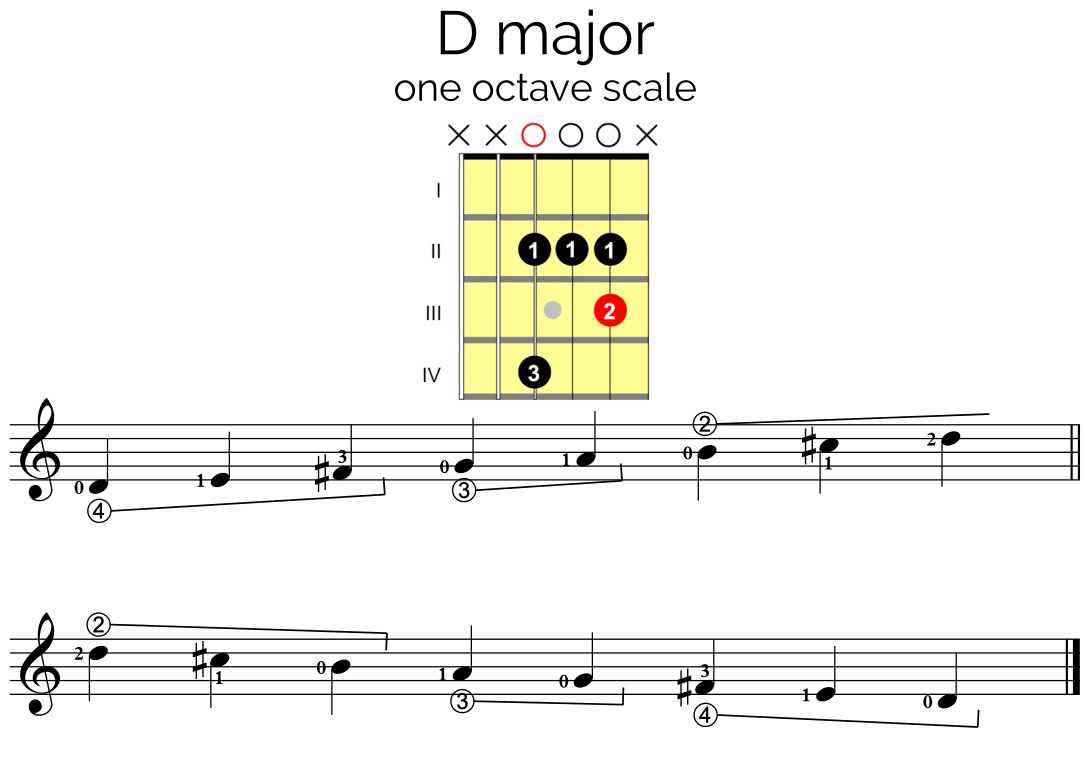
This grouping is the D major scale. To make a D chord, we pick the 1st, 3rd, and 5th notes: D, F#, and A.
You can play these notes in different ways on the fretboard, and as long as they’re played together, it’s a D Major chord.
There’s more to learn about how chords and scales relate, but for now, focus on enjoying playing your guitar!
Chords that Sound Good with the D Major Chord
The most common chords played with the D major chord are:
G Major Chord
G major chord
A Major Chord
A major chord
A7 Chord
A7 chord
Other chords that sound good with the D major chord are:
C Chord
C major chord
Bm Chord
Play this shape on the 2nd fret for the B minor chord
F#m Chord
Play this shape on the 2nd fret for the F# minor chord
C#m Chord
Play this shape on the 4th fret for the C# minor chord
Am Chord
Am chord
We can find notes to all these chords within the D major scale. The chords can appear in any order and for any duration, depending on the piece or song.
One of the best skills we can learn as guitarists is how to practice chords. It’s helpful in pieces of music to switch quickly between chords.
Chord Progressions
A chord progression is one chord moving to another chord. Most songs in Western music follow a chord progression.
Chord progressions can have as little as two chords or many different chords.
Here are two common chord progressions:
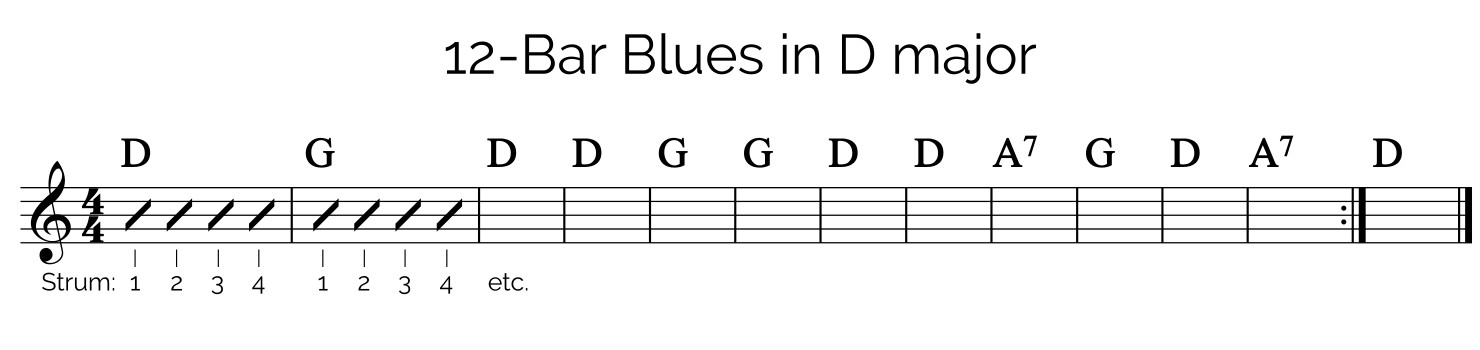
12-Bar Blues in D major
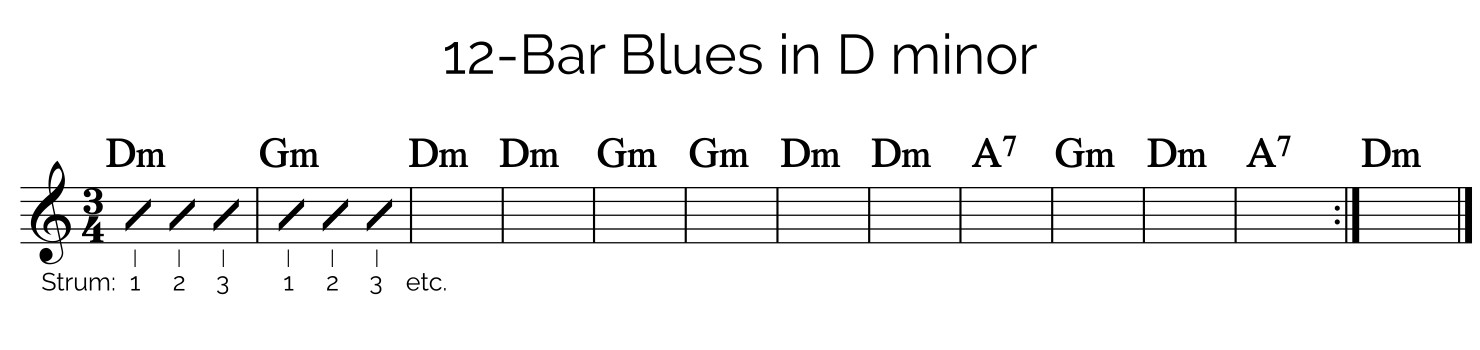
12-Bar Blues in D minor
You can also create your own songs or pieces by putting together chords in any way you like.
Popular Pieces with the D Major Chord
The D chord appears in many songs and pieces of music. From Bach to The Beatles, the D chord is commonly used in guitar music across time, culture, and genre.
Many popular songs use the D chord prominently. Here are a few:
- J.S. Bach – Prelude BWV 1007
- Francisco Tárrega – Capricho Árabe
- Fernando Sor – Study in D Major, Op. 31, No. 1
- Pink Floyd – “Wish You Were Here”
- Guns N’ Roses – “Sweet Child o’ Mine”
- Led Zeppelin – “Stairway to Heaven”
- The Beatles – “Blackbird”

Hi, I’m Allen Mathews.
I started as a folk guitarist, then fell in love with classical guitar in my 20’s. Despite a lot of practice and schooling, I still couldn’t get my music to flow well. I struggled with excess tension. My music sounded forced. And my hands and body were often sore. I got frustrated, and couldn’t see the way forward. Then, over the next decade, I studied with two other stellar teachers – one focused on the technical movements, and one on the musical (he was a concert pianist). In time, I came to discover a new set of formulas and movements. These brought new life and vitality to my practice. Now I help guitarists find more comfort and flow in their music, so they play more beautifully.
Click here for a sample formula.
As I said before, I think your site is outstanding. I have spent my life teaching adults difficult stuff that they really wanted to learn but didn't have the time to learn at the speed we teach university students. Thus I understand only too well how many hundreds of hours you must have spent perfecting your lessons to make my learning as quick and easy as possible.
~ Mike Barron
-Mike Barron
Hi Allen, just wanted to provide some feedback. Since I've started doing the exercises [in The Woodshed program] my guitar is sounding a lot better, with fuller sound, less effort. Its as if I bought a new guitar or got a new pair of hands (or both). Amazing my friend. Thank you!
~ Nusret Aydemir
-Nusret Aydemir
“Success lies in relentless execution of the basics.”
Join the program that takes you from the beginning fundamentals to advanced mastery, so you…
- Move your hands safely and fluidly
- Enjoy fulfilling practices and meaningful work
- Play beautifully with expression and flow
Click the button to take a step towards an
organized, effective guitar practice. >>>